A well-designed landscape lighting project will transform your yard forever. A warmly lit walkway also ads a safety element when welcoming visitors to your home. It takes time to plan a successful all-weather lighting setup for your yard and a huge part of that is ensuring that each piece of lighting is powered correctly. This article will explain several of the most important aspects of correctly wiring and powering a landscape lighting project.
Types of Wiring
The first part in your planning will be determining how to run electricity to your garden or yard lights. Choosing the right type of wiring is based on several factors such as the size, or gauge of wire. There are several gauge sizes that are used in landscape lighting with the most common being 10-gauge, 12-gauge, and 16-gauge wiring. The gauge number determines the thickness of the wire. The lower the gauge, the thicker the wire will be. Below is a size comparison for each of the different types of wire:
Wiring Watts
A Watt is a measurement of power, and every additional fixture added to the circuit requires 4 Watts of electricity to turn on.
For example, a circuit of landscape lights with 10 fixtures will need 40 Watts of electricity to power on. Additionally, a transformer with the proper wattage output is necessary for optimal lighting, so keep that in mind when you're planning your project.
Wiring Length
After determining the wattage and the number of fixtures, you will need a certain length of wire to properly power your landscape lighting. 16-gauge wiring can go as far as 3,135 feet for one fixture at 15V. In comparison, 12-gauge wiring - which is thicker - can reach 10,688 feet for one fixture at 15V.
Below is a wiring distance chart to help you determine the amount of wire required for your landscape lighting setup.
Circuit Type and Wire Connection
When configuring a wire circuit, it is best to create a parallel circuit with your lighting. A parallel circuit is a closed circuit that divides the electrical current into two or more paths before merging at the end to complete the circuit. Within the parallel circuit, the voltage for each component will be the same across the circuit.
Have a look below for a diagram that shows what a parallel circuit with two paths, looks like.

Wiring Tools
If you're still reading, then you're serious about your project. And so, you'll know that working with wiring requires a certain set of specialized tools. It is always important to bring the right tools for the job.
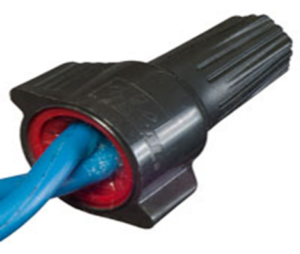
When splicing wire, it is essential to protect the exposed wire with a wire-nut (also known as a Marrette) to ensure there is no interference between the connection. Below is an example of a wing style wire-nut. These come in many shapes and sizes, depending on the gauge of wire that you're splicing. Remember though that this connection isn't waterproof, so ensure that you have a waterproof junction box or an indoor junction area to protect the connections.
Another important tool to have is a wire stripper. This gives the user easy access to work with the exposed wire. If the wire happens to be too long, you can use a wire cutter to shorten the wire to the perfect length. Below is an example of a tool that has both a wire stripper and a wire cutter.
We hope that you've been able to learn a little bit more about some of the planning necessary when building out your landscape lighting project.
If you'd like a little more help setting up your system, please contact us anytime.

